Saturday 17 November 2012

Guacamole

 Guacamole

One of my favorite snack foods is corn chips with guacamole or salsa.  This recipe is one of the most enjoyed by the family.  

Guacamole is really easy to make so I thought I would show you how.


The ingredients are pretty basic.  Avocado, red onion, tomato, lime, coriander (cilantro), Worcestershire sauce, taco sauce, garlic powder, taco seasoning, salt and pepper.


First, cut your avocado in half length way.


Chop the pit with your knife and then twist it to release the pit.


The pit removed.
  

Scoop out the avocado from the skin and place it in a bowl.


Mash the avocado with a fork.


You need about 1/4 of a lime.  Squeeze the 1/4 portion into the mashed avocado.


Chop 1/4 of a red onion.  Add to the mashed avocado.


You only need a couple of sprigs of coriander (cilantro).


Chop the coriander really well.  Add to the mashed avocado.


My recipe calls for two Roma tomatoes but I didn't have any so I just used a really large truss tomato.  Chop the tomato and add to the mashed avocado.


Garlic powder, taco seasoning, salt and pepper.  Add to the mashed avocado.


Now add your Worcestershire sauce and your taco sauce.
All ingredients have been added to the mashed avocado.
Just mix it all together.


The finished Guacamole ready for dipping those corn chips in.
Enjoy!


You can find the recipe here.


Saturday 10 November 2012

Welfare Principles 101 - 72 Hour Kit's

Boy Scout Motto

 
 My heart and prayers go out to all those suffering from Hurricane Sandy and the Guatemala earthquake.  It is an extremely difficult time when you are suffering from the impact of a natural disaster.  This is especially true if you have lost your home or more importantly, your loved ones.  Unfortunately, natural disasters are a part of our life.  Some areas around the world suffer from them more than others.  Nearly all of us will at some point in our life experience a natural disaster.

When the Northridge earthquake hit Los Angeles in 1994, it was the first time that I actually thought, "okay, this is it, we are about to die."  It is a terrible experience that you don't wish to go through again.  Having survived that quake, I then experienced first-hand what it was like to be in the aftermath of a disaster.  There was no power for days, grocery stores were raided, and everything came to a stop.  The loss of power, access to water and food, and other essential supplies are a part of every major natural disaster.  In the more severe disasters, you may lose your home or have to evacuate and need to go to a public shelter or other family members for shelter.  We were blessed to have not lost our home at that time and the damage wasn't severe enough to have to evacuate, but there were many who did lose their homes.

I remember well, how quickly the grocery stores were emptied of essential supplies.  Water, food, toilet paper, batteries, flashlights, and candles were completely depleted within a few short hours of the quake.  It was interesting as we stood by and watched as bystanders.  People were going crazy trying to get supplies.  There were long lines and a lot of angry people.  However, we were prepared.  Because of our preparedness, we were actually able to go to our neighbour's and help those who did not have supplies instead of being the ones in the line.  We had our 72 hour kits, a year's supply of freeze-dried food, a one-month supply of water storage, weeks worth of food in our pantry and plenty of batteries, candles, heating and a cooking supply.

It took officials between 48 and 72 hours to get supplies to people who were in need.  It was nearly a week before grocery stores were stocked again.  Because of our preparedness, we didn't have to stand in one single line for supplies.

Most government agencies tell you to have a 72 hour kit available.  The Church of Jesus Christ of Latter-Day Saints has taught its members over many years to be prepared with 72 hour kits.  I have taught this principle many times over the years to people in our local community, so I thought I would include this in my blog for a wider audience.

This will be the first in a series of welfare principles.  This series will cover areas of welfare that help us to be provident in providing for ourselves.

What is a 72 Hour Kit?


A 72 Hour Kit is a pack of essential supplies to help you survive a disaster or evacuation for 72 hours.  It is called a 72 Hour Kit because, in a disaster, it takes emergency personnel nearly 72 hours to get critical supplies to those in need.  FEMA says it this way on their website, "You may need to survive on your own after an emergency. This means having your own foodwater and other supplies in sufficient quantity to last for at least 72 hours. Local officials and relief workers will be on the scene after a disaster but they cannot reach everyone immediately. You could get help in hours or it might take days."

A 72 Hour Kit can be many things for different people.  It really depends on what your daily needs are.  It will obviously be different for a single person compared to a family, a physically ill person compared to an athlete.  Whatever your situation is, you should customise your kit to your own needs.

A few examples of customising your 72 Hour Kit would be the following:
  • If you have children, you should include a toy, book, stuffed animal or a favourite blanket.  Something that will comfort them and/or keep them occupied.
  • If you are on medication, you should have some extra meds in your kit.
  • Perhaps you have specific food needs, you should pack appropriate food for your needs.
FEMA provides information on planning for emergencies.  Please take a minute and look at their website.  They have some practical tips that are based on dealing with natural disasters and mass evacuations.

FEMA provides a emergency supplies list for you in text or PDF.  Here is the PDF link: FEMA Supplies List

Making your own kit

I will just show some examples but it is up to you to decide what you should have in your kit.  


Start with a bag or container of some sort.  Make sure it is easy to carry or pull.
I would look at dollar stores or 2nd hand stores like St. Vinnies, Deseret Industries or ebay.
You don't want to spend a lot of money for a pack that is going to be sitting around most of the time.
Do make sure that the straps aren't damaged and that there aren't any holes.
Some people buy great big backpacker bags with waste straps.  Most people can't carry that much weight so be sure to get a pack that fits your capability.  The same goes for children.

Water is really essential.  Most instructions on water is that you should keep one gallon (four litres) of water per person.  Water is quite heavy so you may need to distribute the water.  More for adults and less for the children.  Children will not be able to carry their 3 gallons of water.  One gallon per day is for drinking and sanitation.  

Here are some samples of different kinds of foods.  Try to buy cans that don't need a can opener.  It's one less thing to carry.  Also, lunch kits and food in packages don't last as long as cans.  Dried foods such as crackers can last a while and is a good option.  You will need to check your kit every 6 months to rotate food that is about to expire so you don't waste food and you always have good food ready.
Remember to try and buy food that you can eat without cooking.

A change of clothing is important.  You may need to get out of wet clothes and you can have a change of clothes while you wash and dry another set.  Keep a good pair of walking shoes, socks, underwear, jeans and shirt. 

If you live in colder climates then you may want to include a warm hat, gloves or sweat shirt.   Hand warmers are nice to have in your kit as well.  


Personal items are important as well.  I have shown three different ways of packing personal items in the pictures above.  The top picture is a kit that I received from the airline on one of my business trips.  The second is using special waterproof bags that I bought at K-Mart in the camping section.  The third picture is using zip-lock bags.

The second option is probably the best but slightly more expensive for the waterproof bags.


Having a small first aid kit is important.  Make sure you keep it small and just have some of the basic essentials.  You can buy these kits at stores like Walmart, BigW, Target, K-Mart, Pharmacies, and some groceries store.

Make sure you keep some spare medication in your bag and be sure to not let it expire.  If you wear contacts you might want to keep a pair of old glasses in your bag as well.

A waterproof flashlight and batteries are an important item.  It is good to have a small one available for each of the children to have.  Check the expiry date on your batteries and store them separate to the flashlight.

Here are some other items that can come in real handy.  Waterproof matches, multitool, whistle, compass and the small flashlight I mentioned earlier.  I also have a Leatheman multitool that can convert to a pair of pliers.


An emergency blanket may be the only thing to keep you warm so be sure and pack one for each person.  Also, you should keep a rain poncho that is big enough to cover you and your backpack.

These items aren't essential but can be very handy.  Depending on where you need to evacuate the ground cover and rope and easily become shelter for you.  The shovel can be very handy indeed!  ;-)

Here are a couple of nice to have items.  A flashlight that works by shaking it for a little while. No batteries are required.  A water purifier that is small and light weight.
This will add to the cost of your kit but are very nice to have.

I think one of these are really important.  It is a wind up radio and flashlight.  They are expensive but it is well worth having a radio for updates on the disaster and relief efforts.

I used to have one of these until it mysteriously went missing at one of my presentations.  Just saying...  :-)

Conclusion

Having a 72 hour kit is like having insurance.  You hope you never have to use it, but when you do, you are so thankful that you have it.

I hope you take the time to prepare yourself.  Remember that these are guidelines and you can include anything you want.  Just remember to:
  • keep it as portable as possible
  • don't over burden yourself with the weight  
  • if you have children, you will need to carry some of their items
  • don't forget to check expiry dates every 6 months.

Oh, just in case you don't want to go through the trouble of making your own, you can buy 72 hour kits.  Just look on-line for a retailer local to you.

Resources


FEMA Ready Website

Basic Disaster Supplies Kit

Maintaining Your Kit

Kit Storage Locations

Living Essentials - 72 Hour Kit

Living Essentials - Using your 72 Hour Kit


Saturday 27 October 2012

Corn Bread with Honey Butter

Corn Bread with Honey Butter

Hot corn bread with honey butter is sooooooo yummy.  I try my best not to make this very often as it is so fattening.  The corn bread isn't really that bad, it's all the honey butter that ends up on it that is the problem.  To whom ever invented honey butter, I love you and hate you at the same time!

Here is a really good recipe for corn bread.  

Corn Bread


Here is a list of ingredients.  Flour, cornmeal (polenta), milk, egg, sugar, oil, baking powder and salt.


Polenta.
For those of us who live in Australia, American cornmeal is called Polenta here.

First mix your dry ingredients in a mixing bowl, then add all your wet ingredients and mix well with a whisk.

This is how it should look.  Very similar to cake batter.

Spray a 8x8 cooking dish with cooking spray.

Pour the batter into the dish.  Bake at 200C or 400F for 20-25 minutes.  Check the bread by putting a skewer or knife into the middle at about 20 minutes to see if it is cooked.  

Don't over cook this or it will be dry and crumbly.  

It should be golden brown on top.

It should slice nicely into approximately 9 good servings.

Add some honey butter and you are set to enjoy.


Corn Bread Ingredients

  • 1 Cup Plain Flour
  • 1 Cup Cornmeal (Polenta)
  • 1 Cup Milk
  • 1/2 Cup Sugar
  • 1/3 Cup Oil
  • 1 Large Egg
  • 3 tsp Baking Powder
  • 1 tsp Salt

Honey Butter

This is almost too good to be true...

The ingredients.  Honey and Butter! :-)


Make sure your butter and honey are at room temperature.

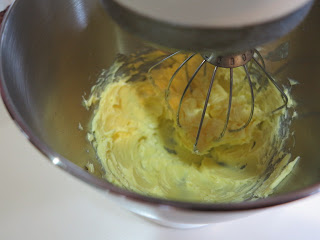
Place the butter into a mixer.

Mix for about 1 minute.

With the mixer running, pour the honey into the mixer. Mix for about a minute.

Scrape the sides down with a spatula.  Then mix again until the honey butter gets a nice glossy sheen to it.

 I have put it into a ramekin to serve.


Honey Butter Ingredients

1 cup Butter (226.8 grams) 
1/2 cup Honey


Wednesday 24 October 2012

My Top 25 iPad Apps

My Top 25 iPad Apps


 Apple iPad

I would be amiss if I didn't do a technology blog so I decided my first tech blog would be on my iPad apps.  Everyone uses their technology differently and so this may or may not be helpful.  Regardless, I thought that I would show you how I use mine as it might prove to be useful to someone who has not seen some of the apps that I will show you.

When I started writing this blog I was only going to show my top 10.  I gathered my apps that I use regularly and ended up with just over 30.  Then when I started to categorise them I realised I hadn't really gathered all of my apps that I use and the list grew closer to 40.   I have a lot of apps so I'm only going to show you my most used iPad apps.  This is my top 25.  I have put them into categories to make it a little easier to look through.


Books / Magazines

Kindle

Amazon's Kindle is a great way to get books.  I find it a cheap way to get books when I don't wish to collect the physical book.  

Zinio

Zinio is an application that allows you to buy magazines on-line.  You buy a magazine subscription and then it is downloaded each month.  


Communications

Skype

I like Skype better than Facetime.  Skype allows me to keep in touch with my family during my work travels.   
If I'm not on my iPad, I can still connect from my PC and contact my family on their iPad or PC.


Cooking

All Recipes Pro

I have found that All Recipes is one of the best on-line resources for recipes.  It also allows you to keep your own recipe box, post your own recipes and rate others recipes.  It has a good lay out and I have found that the recipes are rated quite well using crowd sourcing.


Culinary Fundamentals

If you are an aspiring chef, this is the app for you.  It has short videos showing you basic methods of cooking.  It will show you how to cut up various types of meat and vegetables.  It will show you techniques and basic recipes.

Education

Khan Academy

Khan Academy is a great learning tool.  Whether you are 5 or 65, you can learn on-line.  Try it, you will definitely fine it helpful in your learning.


BYU Studies

Brigham Young University (BYU) provides a tool to look at many published articles on religious studies.  This is a great app to help you in your studies.  It is easily accessed, rather than try and locate the same articles on the web.

Games

Scrabble HD

I had to at least include one game, so I included the one I play the most.  It is a great way to keep up your vocabulary and have fun doing it.


Health/Medical

WebMD

WebMD is a great app to go to if you are trying to find out about medical problems you might be experiencing.  If you want to look up symptoms it will help you find the most likely diagnosis.


Movies

IMDB

The Internet Movie Database is a great place to look at movies that are up and coming or have come and gone.  This is a good place to look at the content of movies before you send your children.


News

NY Times

The NY Times is a great app that has some excellent news.  They have great reporting on the US elections and have a great technology, food & dining, and arts sections.


The Weather Channel

This is a quick easy way to check the weather forecast.  You just put in your location and then keep track of the local weather.  


Deseret News

If you are from Utah, like I am, you know that the Deseret News is a great place to get local news.  However, if you are not trying to keep up on local Utah news, you will still like this app as it has great sections on the family and issues facing the family.  


LDS Church News

This app lets you keep up to date with the news of The Church of Jesus Christ of Latter-Day Saints.  It also allows you to connect to three church radio stations in Utah to listen to music, news and programs live.


Photography

Photoshop Express

Adobe Photoshop Express is a great app to work with your photos.  Whether you just want to adjust lighting or create an entirely different photo you will like this app.  


PhotoStudioHD

Photo Studio HD is a great app if you want to apply filters to your photos.  It has 190 effects and filters from Sepia to Photo frames.


Religion


Gospel Library

Gospel Library is an app that provides you with a full set off scriptures, church manuals, conference talks, and many other books and manuals.  I use this app everyday for scripture study and for talk preparation or lesson preparations.  A very handy app indeed!


Deseret Bookshelf

Deseret Bookshelf is similar to Kindle except that it is for Deseret Book store.  The Christian bookstore for The Church of Jesus Christ of Latter-Day Saints.  It is a great way to buy and read religious books.  They have many free books included with it.  Excellent app!


Science & Technology


MIT Technology Review

The MIT Technology Review app is linked to their website reviewing new breakthroughs in technology at MIT.  There are some amazing new technologies on topics of computing, the web, communications, energy, biomedicine, and business.

NASA HD

I love NASA.  I can't get enough of the Hubble telescope images and the Mars curiosity images.  What about the new SpaceX Dragon cargo ship docking with the International Space Station!  Have you seen Boeing's new concept passenger plane, the X-48? Or, what about Northrop Grumman's flying wing?  Radical, dude! 
If you love space and aeronautics then you have to get this app as it will keep you continually satisfied with information. 

TED
Technology, Entertainment, Design (TED) is a nonprofit organisation devoted to ideas worth spreading.  You can watch talks from entrepreneurs, scientists, technologists, designers and global humanitarians on a variety of issues that impact us today.  There are some really awe inspiring talks and I would highly recommend this app.


Tools


Noteshelf

Noteshelf is one of my favourite apps to take notes of meetings and conferences.  It also has the ability to keep your personal journal and many other functions.  You can use your stylus to write directly on your iPad to keep you notes in your own handwriting.


Converter+

This is a great app to convert measurements, rates, weights and measures and many more conversions.


Travel

Maps+

This is one of the best map apps out there.  It can give you directions, allow you to pin exact points, and map routes.  I know Apple is trying to start their own but it isn't anywhere near as good as Google.


Flight+

Flight+ is a great app if you travel a lot.  You put in your flights and it will update you on delays and changes in gates and flight schedules.